Upcycling for Beginners: Start with These 5 Simple Projects
Upcycling for Beginners is a fantastic way to reduce waste and get creative by transforming old, unused items into something new and functional. Whether you’re looking to start small or dive into bigger projects, this beginner-friendly guide will show you how to get started with five simple upcycling projects. These projects require minimal materials and effort, making them perfect for anyone new to upcycling.
In this guide, we’ll explore five simple upcycling projects perfect for beginners. These projects require minimal materials, allow for plenty of personalization, and most importantly, can help you reduce clutter in your home. Let’s get started on your upcycling journey!
1. Turn Old T-Shirts into Reusable Bags
If you’re just starting out with upcycling for beginners, turning old t-shirts into reusable bags is a simple and rewarding project.
If you’ve got old t-shirts you no longer wear, don’t toss them out! You can easily transform them into sturdy, reusable bags for groceries, beach trips, or even laundry. This simple project requires no sewing and only basic materials.
Materials Needed:
- An old t-shirt
- Scissors
Instructions:
- Lay the t-shirt flat and cut off the sleeves. You’ll want to cut inside the seams for a clean look.
- Cut off the neckline in a round or square shape to create the bag’s opening. This doesn’t need to be perfect, and you can adjust it based on how big you want the opening.
- Flip the shirt inside out. Along the bottom hem, cut small slits about 1-inch apart, creating fringe all along the edge.
- Tie each pair of fringes together in a double knot, making sure the knots are tight and close together. This creates the bottom of your bag.
- Turn the shirt right-side out again, and you’ve got yourself a reusable bag!
This project is great for anyone looking to minimize plastic bag usage. Plus, these t-shirt bags are washable and durable, making them a practical and eco-friendly solution.
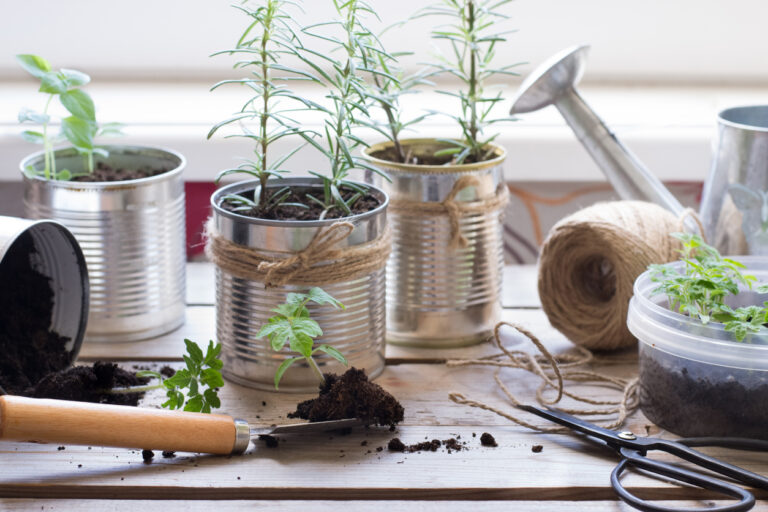
2. Create a Planter from a Tin Can
Old tin cans can easily be turned into chic planters for herbs, succulents, or flowers. This upcycling project is perfect for adding a touch of greenery to your home without the need for store-bought pots.
Materials Needed:
- Empty tin can (washed and dried)
- Paint or decorative paper
- Glue or hot glue gun
- Soil and plants
Instructions:
- Clean your tin can thoroughly and remove any labels.
- Paint the outside of the tin can or cover it with decorative paper. This is your chance to get creative with colors and patterns. You can go for a minimalist look or something vibrant and fun.
- Once the paint or glue has dried, you can add some drainage holes to the bottom of the can with a hammer and nail if you plan to use it outdoors or with live plants.
- Add soil and your chosen plant, and your upcycled planter is ready!
This project is simple, quick, and offers endless decorative possibilities. If you don’t have a green thumb, you can also use these tins for other purposes, such as desk organizers or candle holders.
3. Repurpose a Wooden Pallet into a Shelving Unit
Wooden pallets are often discarded after being used for shipping, but they make excellent material for DIY furniture. If you have access to a pallet, you can turn it into a simple, rustic shelving unit that’s perfect for storing books, plants, or decorative items.
Materials Needed:
- Wooden pallet
- Sandpaper
- Paint or wood stain
- Screws and a drill (optional)
- Mounting brackets (optional)
Instructions:
- Clean the pallet thoroughly to remove any dirt or debris. Sand down any rough edges or splinters.
- Depending on your style preference, you can either stain or paint the pallet. A wood stain will give it a more rustic, natural look, while a bright paint color will give it a modern, fresh feel.
- Once the paint or stain has dried, you can choose to either lean the pallet against a wall for a freestanding shelf or use mounting brackets to secure it to the wall.
- If you want to add extra storage, you can use screws to attach additional wooden boards across the open spaces of the pallet to create more shelves.
This is an excellent project for those who want to incorporate a bit of DIY furniture into their home. It’s surprisingly easy and allows for customization depending on the space you have available.
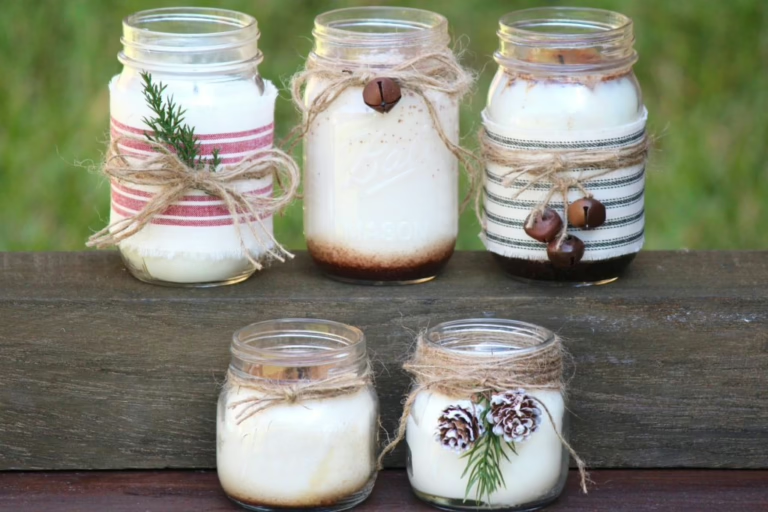
4. Transform Glass Jars into Stylish Storage Containers
Glass jars are one of the easiest materials to upcycle, as their versatility knows no bounds. Whether it’s mason jars or old pasta sauce jars, you can turn them into stylish storage containers for the kitchen, bathroom, or even your home office.
Materials Needed:
- Glass jars with lids
- Paint (optional)
- Decorative labels
- Ribbon or twine (optional)
- Glue
Instructions:
- Clean and dry your jars thoroughly, removing any labels.
- If you want to add color, you can paint the lids or the jars themselves with acrylic paint or spray paint. This adds a personalized touch and can help the jars match your existing decor.
- Once the paint has dried, you can add decorative labels to the jars to identify what’s inside—think flour, sugar, or cotton balls. You can either print out labels or write them by hand for a more rustic feel.
- For an extra touch, you can tie a piece of ribbon or twine around the top of each jar.
- Fill the jars with whatever you need—pantry staples, bathroom essentials, or even craft supplies.
This project is a fantastic way to cut down on plastic storage and organize your home in an eco-friendly way. Plus, glass jars are sturdy and easy to clean, making them a long-lasting option.
5. Upcycle a Ladder into a Plant Stand
Got an old, unused ladder? Don’t let it gather dust—turn it into a charming plant stand to showcase your favorite plants or flowers. This project is an ideal way to add vertical storage or display space to your home, especially if you’re tight on room.
Materials Needed:
- Old wooden or metal ladder
- Sandpaper (for wooden ladders)
- Paint or wood stain (optional)
- Plants in pots
Instructions:
- Clean the ladder thoroughly. If it’s a wooden ladder, you may want to sand it down to smooth out any rough patches.
- Depending on the look you want, you can either leave the ladder as-is for a rustic vibe or paint it to match your decor.
- Once it’s dry, simply place your potted plants on the different rungs of the ladder. You can arrange them by height or color for a visually appealing display.
- If you have heavier plants or pots, make sure they’re stable on the ladder. You might also want to secure the ladder to the wall for extra safety, especially if it’s tall.
This project is perfect for anyone looking to add a decorative and functional piece to their living space. It’s simple, customizable, and a great way to bring greenery indoors.
Upcycling Tips for Beginners
Now that you have five easy upcycling projects to start with, here are a few helpful tips to keep in mind as you embark on your upcycling journey. These tips are ideal for upcycling for beginners and will help you get the most out of your creative efforts:
- Start Small – Don’t overwhelm yourself with large projects. Simple items like jars, cans, or t-shirts are perfect starting points.
- Use What You Have – Upcycling is all about repurposing items you already own. Before buying anything new, take a look around your home to see what can be reused or transformed.
- Personalize Your Projects – One of the best things about upcycling is the chance to express your creativity. Don’t be afraid to experiment with colors, patterns, and designs that suit your personal style.
- Keep Functionality in Mind – While upcycling is fun, make sure that your finished projects are functional. A new item should serve a purpose, whether it’s decorative, practical, or both.
- Have Fun – Upcycling is all about creativity and sustainability. Enjoy the process, and don’t be afraid to make mistakes. Each project is a chance to learn something new!
Final Thoughts
Upcycling for beginners doesn’t have to be complicated. By starting with these five projects, you’ll build confidence and reduce waste in your home. If you’re interested in learning more or finding places to shop upcycled goods, check out this guide on upcycling shops from Earth911.
Remember, upcycling is as much about the journey as it is about the finished product. So take your time, enjoy the process, and feel good knowing you’re making a positive impact on the environment.
Happy upcycling!